
15.6 APP入口及主页
本节来介绍一下APP入口及首页。
15.6.1 APP入口
main函数为APP入口函数,实现如下:
1void main() => Global.init().then((e) => runApp(MyApp()));初始化完成后才会加载UI(MyApp),MyApp 是应用的入口Widget,实现如下:
1class MyApp extends StatelessWidget {
2 // This widget is the root of your application.
3
4 Widget build(BuildContext context) {
5 return MultiProvider(
6 providers: <SingleChildCloneableWidget>[
7 ChangeNotifierProvider.value(value: ThemeModel()),
8 ChangeNotifierProvider.value(value: UserModel()),
9 ChangeNotifierProvider.value(value: LocaleModel()),
10 ],
11 child: Consumer2<ThemeModel, LocaleModel>(
12 builder: (BuildContext context, themeModel, localeModel, Widget child) {
13 return MaterialApp(
14 theme: ThemeData(
15 primarySwatch: themeModel.theme,
16 ),
17 onGenerateTitle: (context){
18 return GmLocalizations.of(context).title;
19 },
20 home: HomeRoute(), //应用主页
21 locale: localeModel.getLocale(),
22 //我们只支持美国英语和中文简体
23 supportedLocales: [
24 const Locale('en', 'US'), // 美国英语
25 const Locale('zh', 'CN'), // 中文简体
26 //其它Locales
27 ],
28 localizationsDelegates: [
29 // 本地化的代理类
30 GlobalMaterialLocalizations.delegate,
31 GlobalWidgetsLocalizations.delegate,
32 GmLocalizationsDelegate()
33 ],
34 localeResolutionCallback:
35 (Locale _locale, Iterable<Locale> supportedLocales) {
36 if (localeModel.getLocale() != null) {
37 //如果已经选定语言,则不跟随系统
38 return localeModel.getLocale();
39 } else {
40
41 Locale locale;
42 //APP语言跟随系统语言,如果系统语言不是中文简体或美国英语,
43 //则默认使用美国英语
44 if (supportedLocales.contains(_locale)) {
45 locale= _locale;
46 } else {
47 locale= Locale('en', 'US');
48 }
49 return locale;
50 }
51 },
52 // 注册命名路由表
53 routes: <String, WidgetBuilder>{
54 "login": (context) => LoginRoute(),
55 "themes": (context) => ThemeChangeRoute(),
56 "language": (context) => LanguageRoute(),
57 },
58 );
59 },
60 ),
61 );
62 }
63}在上面的代码中:
- 我们的根widget是
MultiProvider,它将主题、用户、语言三种状态绑定到了应用的根上,如此一来,任何路由中都可以通过Provider.of()来获取这些状态,也就是说这三种状态是全局共享的! HomeRoute是应用的主页。- 在构建
MaterialApp时,我们配置了APP支持的语言列表,以及监听了系统语言改变事件;另外MaterialApp消费(依赖)了ThemeModel和LocaleModel,所以当APP主题或语言改变时MaterialApp会重新构建 - 我们注册了命名路由表,以便在APP中可以直接通过路由名跳转。
- 为了支持多语言(本APP中我们支持美国英语和中文简体两种语言)我们实现了一个
GmLocalizationsDelegate,子Widget中都可以通过GmLocalizations来动态获取APP当前语言对应的文案。关于GmLocalizationsDelegate和GmLocalizations的实现方式读者可以参考“国际化”一章中的介绍,此处不再赘述。
15.6.2 主页
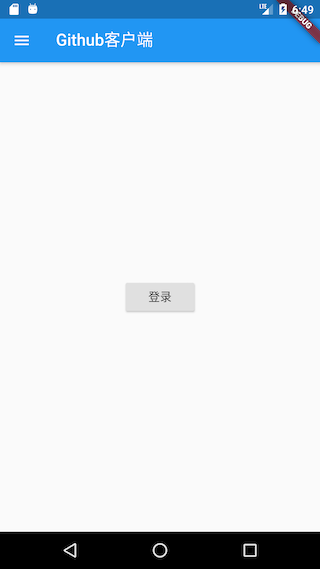
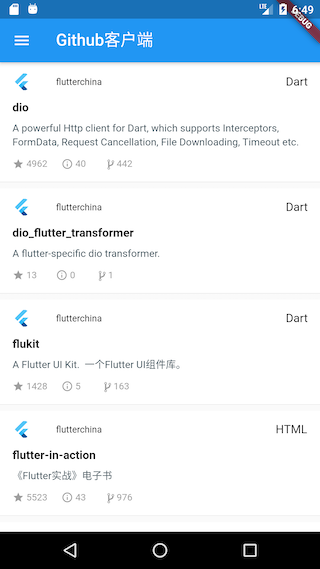
为了简单起见,当APP启动后,如果之前已登录了APP,则显示该用户项目列表;如果之前未登录,则显示一个登录按钮,点击后跳转到登录页。另外,我们实现一个抽屉菜单,里面包含当前用户头像及APP的菜单。下面我们先看看要实现的效果,如图15-1、15-2所示:
我们在“lib/routes”下创建一个“home_page.dart”文件,实现如下:
1class HomeRoute extends StatefulWidget {
2
3 _HomeRouteState createState() => _HomeRouteState();
4}
5
6class _HomeRouteState extends State<HomeRoute> {
7
8 Widget build(BuildContext context) {
9 return Scaffold(
10 appBar: AppBar(
11 title: Text(GmLocalizations.of(context).home),
12 ),
13 body: _buildBody(), // 构建主页面
14 drawer: MyDrawer(), //抽屉菜单
15 );
16 }
17 ...// 省略
18}上面代码中,主页的标题(title)我们是通过GmLocalizations.of(context).home来获得,GmLocalizations是我们提供的一个Localizations类,用于支持多语言,因此当APP语言改变时,凡是使用GmLocalizations动态获取的文案都会是相应语言的文案,这在前面“国际化”一章中已经介绍过,读者可以前翻查阅。
我们通过 _buildBody()方法来构建主页内容,_buildBody()方法实现代码如下:
1  Widget _buildBody() {
2    UserModel userModel = Provider.of<UserModel>(context);
3    if (!userModel.isLogin) {
4      //用户未登录,显示登录按钮
5      return Center(
6        child: RaisedButton(
7          child: Text(GmLocalizations.of(context).login),
8          onPressed: () => Navigator.of(context).pushNamed("login"),
9        ),
10      );
11    } else {
12      //已登录,则展示项目列表
13      return InfiniteListView<Repo>(
14        onRetrieveData: (int page, List<Repo> items, bool refresh) async {
15          var data = await Git(context).getRepos(
16            refresh: refresh,
17            queryParameters: {
18              'page': page,
19              'page_size': 20,
20            },
21          );
22          //把请求到的新数据添加到items中
23          items.addAll(data);
24          // 如果接口返回的数量等于'page_size',则认为还有数据,反之则认为最后一页
25          return data.length==20;
26        },
27        itemBuilder: (List list, int index, BuildContext ctx) {
28          // 项目信息列表项
29          return RepoItem(list[index]);
30        },
31      );
32    }
33  }
34}上面代码注释很清楚:如果用户未登录,显示登录按钮;如果用户已登录,则展示项目列表。这里项目列表使用了InfiniteListView Widget,它是flukit package中提供的。InfiniteListView同时支持了下拉刷新和上拉加载更多两种功能。onRetrieveData 为数据获取回调,该回调函数接收三个参数:
| 参数名 | 类型 | 解释 |
|---|---|---|
| page | int | 当前页号 |
| items | List<T> | 保存当前列表数据的List |
| refresh | bool | 是否是下拉刷新触发 |
返回值类型为bool,为true时表示还有数据,为false时则表示后续没有数据了。onRetrieveData 回调中我们调用Git(context).getRepos(...)来获取用户项目列表,同时指定每次请求获取20条。当获取成功时,首先要将新获取的项目数据添加到items中,然后根据本次请求的项目条数是否等于期望的20条来判断还有没有更多的数据。在此需要注意,Git(context).getRepos(…)方法中需要refresh参数来判断是否使用缓存。
itemBuilder为列表项的builder,我们需要在该回调中构建每一个列表项Widget。由于列表项构建逻辑较复杂,我们单独封装一个RepoItem Widget 专门用于构建列表项UI。RepoItem 实现如下:
1import '../index.dart';
2
3class RepoItem extends StatefulWidget {
4 // 将`repo.id`作为RepoItem的默认key
5 RepoItem(this.repo) : super(key: ValueKey(repo.id));
6
7 final Repo repo;
8
9
10 _RepoItemState createState() => _RepoItemState();
11}
12
13class _RepoItemState extends State<RepoItem> {
14
15 Widget build(BuildContext context) {
16 var subtitle;
17 return Padding(
18 padding: const EdgeInsets.only(top: 8.0),
19 child: Material(
20 color: Colors.white,
21 shape: BorderDirectional(
22 bottom: BorderSide(
23 color: Theme.of(context).dividerColor,
24 width: .5,
25 ),
26 ),
27 child: Padding(
28 padding: const EdgeInsets.only(top: 0.0, bottom: 16),
29 child: Column(
30 crossAxisAlignment: CrossAxisAlignment.start,
31 children: <Widget>[
32 ListTile(
33 dense: true,
34 leading: gmAvatar(
35 //项目owner头像
36 widget.repo.owner.avatar_url,
37 width: 24.0,
38 borderRadius: BorderRadius.circular(12),
39 ),
40 title: Text(
41 widget.repo.owner.login,
42 textScaleFactor: .9,
43 ),
44 subtitle: subtitle,
45 trailing: Text(widget.repo.language ?? ""),
46 ),
47 // 构建项目标题和简介
48 Padding(
49 padding: const EdgeInsets.symmetric(horizontal: 16.0),
50 child: Column(
51 crossAxisAlignment: CrossAxisAlignment.start,
52 children: <Widget>[
53 Text(
54 widget.repo.fork
55 ? widget.repo.full_name
56 : widget.repo.name,
57 style: TextStyle(
58 fontSize: 15,
59 fontWeight: FontWeight.bold,
60 fontStyle: widget.repo.fork
61 ? FontStyle.italic
62 : FontStyle.normal,
63 ),
64 ),
65 Padding(
66 padding: const EdgeInsets.only(top: 8, bottom: 12),
67 child: widget.repo.description == null
68 ? Text(
69 GmLocalizations.of(context).noDescription,
70 style: TextStyle(
71 fontStyle: FontStyle.italic,
72 color: Colors.grey[700]),
73 )
74 : Text(
75 widget.repo.description,
76 maxLines: 3,
77 style: TextStyle(
78 height: 1.15,
79 color: Colors.blueGrey[700],
80 fontSize: 13,
81 ),
82 ),
83 ),
84 ],
85 ),
86 ),
87 // 构建卡片底部信息
88 _buildBottom()
89 ],
90 ),
91 ),
92 ),
93 );
94 }
95
96 // 构建卡片底部信息
97 Widget _buildBottom() {
98 const paddingWidth = 10;
99 return IconTheme(
100 data: IconThemeData(
101 color: Colors.grey,
102 size: 15,
103 ),
104 child: DefaultTextStyle(
105 style: TextStyle(color: Colors.grey, fontSize: 12),
106 child: Padding(
107 padding: const EdgeInsets.symmetric(horizontal: 16),
108 child: Builder(builder: (context) {
109 var children = <Widget>[
110 Icon(Icons.star),
111 Text(" " +
112 widget.repo.stargazers_count
113 .toString()
114 .padRight(paddingWidth)),
115 Icon(Icons.info_outline),
116 Text(" " +
117 widget.repo.open_issues_count
118 .toString()
119 .padRight(paddingWidth)),
120
121 Icon(MyIcons.fork), //我们的自定义图标
122 Text(widget.repo.forks_count.toString().padRight(paddingWidth)),
123 ];
124
125 if (widget.repo.fork) {
126 children.add(Text("Forked".padRight(paddingWidth)));
127 }
128
129 if (widget.repo.private == true) {
130 children.addAll(<Widget>[
131 Icon(Icons.lock),
132 Text(" private".padRight(paddingWidth))
133 ]);
134 }
135 return Row(children: children);
136 }),
137 ),
138 ),
139 );
140 }
141}上面代码有两点需要注意:
在构建项目拥有者头像时调用了
gmAvatar(…)方法,该方法是是一个全局工具函数,专门用于获取头像图片,实现如下:1Widget gmAvatar(String url, { 2 double width = 30, 3 double height, 4 BoxFit fit, 5 BorderRadius borderRadius, 6}) { 7 var placeholder = Image.asset( 8 "imgs/avatar-default.png", //头像占位图,加载过程中显示 9 width: width, 10 height: height 11 ); 12 return ClipRRect( 13 borderRadius: borderRadius ?? BorderRadius.circular(2), 14 child: CachedNetworkImage( 15 imageUrl: url, 16 width: width, 17 height: height, 18 fit: fit, 19 placeholder: (context, url) =>placeholder, 20 errorWidget: (context, url, error) =>placeholder, 21 ), 22 ); 23}代码中调用了
CachedNetworkImage是cached_network_image包中提供的一个Widget,它不仅可以在图片加载过程中指定一个占位图,而且还可以对网络请求的图片进行缓存,更多详情读者可以自行查阅其文档。由于Flutter 的Material 图标库中没有fork图标,所以我们在iconfont.cn上找了一个fork图标,然后根据“图片和Icon”一节中介绍的使用自定义字体图标的方法集成到了我们的项目中。
15.6.3 抽屉菜单
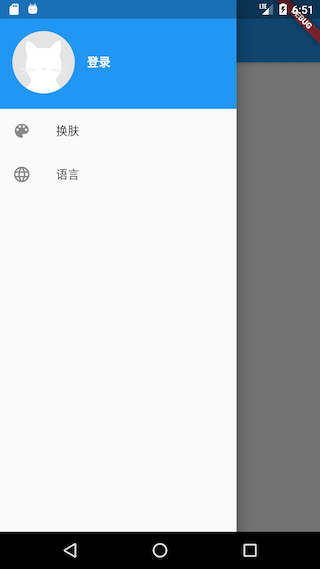
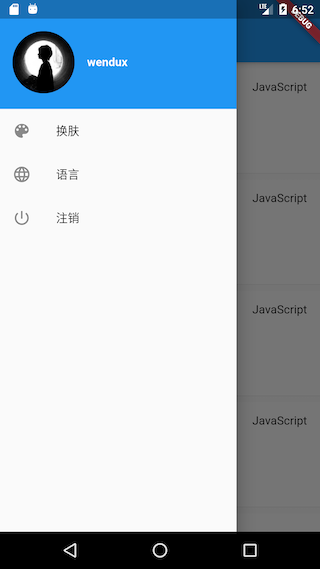
抽屉菜单分为两部分:顶部头像和底部功能菜单项。当用户未登录,则抽屉菜单顶部会显示一个默认的灰色占位图,若用户已登录,则会显示用户的头像。抽屉菜单底部有“换肤”和“语言”两个固定菜单,若用户已登录,则会多一个“注销”菜单。用户点击“换肤”和“语言”两个菜单项,会进入相应的设置页面。我们的抽屉菜单效果如图15-3、15-4所示:
实现代码如下:
1class MyDrawer extends StatelessWidget {
2 const MyDrawer({
3 Key key,
4 }) : super(key: key);
5
6
7 Widget build(BuildContext context) {
8 return Drawer(
9 //移除顶部padding
10 child: MediaQuery.removePadding(
11 context: context,
12 removeTop: true,
13 child: Column(
14 crossAxisAlignment: CrossAxisAlignment.start,
15 children: <Widget>[
16 _buildHeader(), //构建抽屉菜单头部
17 Expanded(child: _buildMenus()), //构建功能菜单
18 ],
19 ),
20 ),
21 );
22 }
23
24 Widget _buildHeader() {
25 return Consumer<UserModel>(
26 builder: (BuildContext context, UserModel value, Widget child) {
27 return GestureDetector(
28 child: Container(
29 color: Theme.of(context).primaryColor,
30 padding: EdgeInsets.only(top: 40, bottom: 20),
31 child: Row(
32 children: <Widget>[
33 Padding(
34 padding: const EdgeInsets.symmetric(horizontal: 16.0),
35 child: ClipOval(
36 // 如果已登录,则显示用户头像;若未登录,则显示默认头像
37 child: value.isLogin
38 ? gmAvatar(value.user.avatar_url, width: 80)
39 : Image.asset(
40 "imgs/avatar-default.png",
41 width: 80,
42 ),
43 ),
44 ),
45 Text(
46 value.isLogin
47 ? value.user.login
48 : GmLocalizations.of(context).login,
49 style: TextStyle(
50 fontWeight: FontWeight.bold,
51 color: Colors.white,
52 ),
53 )
54 ],
55 ),
56 ),
57 onTap: () {
58 if (!value.isLogin) Navigator.of(context).pushNamed("login");
59 },
60 );
61 },
62 );
63 }
64
65 // 构建菜单项
66 Widget _buildMenus() {
67 return Consumer<UserModel>(
68 builder: (BuildContext context, UserModel userModel, Widget child) {
69 var gm = GmLocalizations.of(context);
70 return ListView(
71 children: <Widget>[
72 ListTile(
73 leading: const Icon(Icons.color_lens),
74 title: Text(gm.theme),
75 onTap: () => Navigator.pushNamed(context, "themes"),
76 ),
77 ListTile(
78 leading: const Icon(Icons.language),
79 title: Text(gm.language),
80 onTap: () => Navigator.pushNamed(context, "language"),
81 ),
82 if(userModel.isLogin) ListTile(
83 leading: const Icon(Icons.power_settings_new),
84 title: Text(gm.logout),
85 onTap: () {
86 showDialog(
87 context: context,
88 builder: (ctx) {
89 //退出账号前先弹二次确认窗
90 return AlertDialog(
91 content: Text(gm.logoutTip),
92 actions: <Widget>[
93 FlatButton(
94 child: Text(gm.cancel),
95 onPressed: () => Navigator.pop(context),
96 ),
97 FlatButton(
98 child: Text(gm.yes),
99 onPressed: () {
100 //该赋值语句会触发MaterialApp rebuild
101 userModel.user = null;
102 Navigator.pop(context);
103 },
104 ),
105 ],
106 );
107 },
108 );
109 },
110 ),
111 ],
112 );
113 },
114 );
115 }
116}用户点击“注销”,userModel.user 会被置空,此时所有依赖userModel的组件都会被rebuild,如主页会恢复成未登录的状态。
本小节我们介绍了APP入口MaterialApp的一些配置,然后实现了APP的首页。后面我们将展示登录页、换肤页、语言切换页。